
Learning how to use your fingers correctly is one of the most important steps in becoming a confident bass guitarist. Whether you’re a beginner or teaching someone new, a bass guitar fingering chart is an essential tool. It shows which fingers to use on each fret, how notes are arranged on the fretboard, and the most efficient way to play bass lines.
In this comprehensive guide, you’ll learn what a bass guitar fingering chart is, how it works, why it’s important, and how beginners can use it to improve technique, accuracy, and speed.
What Is a Bass Guitar Fingering Chart?
A bass guitar fingering chart is a visual diagram that shows:
- The four bass strings (E, A, D, G)
- The notes found on each fret
- Which finger to place on each fret
- Correct hand positions for efficient playing
- Basic scale and pattern fingerings
Because the bass guitar fretboard can seem overwhelming at first, a fingering chart serves as a map to guide beginners through proper finger use and note locations.
After reviewing your accuracy score, try validating your pitch with the pitch accuracy checker for consistent practice.
Why You Need a Bass Guitar Fingering Chart
A fingering chart helps you:
Learn Proper Technique
It teaches correct finger placement so beginners don’t develop bad habits.
Understand the Fretboard
You see where every note is located, making theory easier to apply.
Improve Speed and Accuracy
Efficient finger use allows smoother transitions between notes.
Learn Scales and Patterns Faster
Charts show the best finger patterns for major, minor, and pentatonic scales.
Build Muscle Memory
With repetition, your fingers automatically know where to go.
Understanding the 4-String Bass Layout
Standard 4-string bass guitars are tuned to:
- E – lowest string
- A
- D
- G – highest string
Every fret raises the pitch by a half-step, meaning notes move in alphabetical and sharp/flat order across the neck.
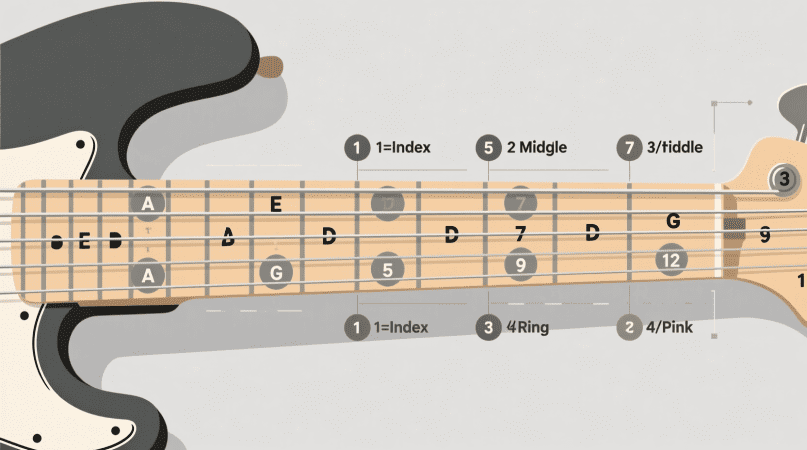
Finger Numbering System (1–4)
The bass guitar fingering system uses four fingers:
- 1 = Index finger
- 2 = Middle finger
- 3 = Ring finger
- 4 = Pinky finger
In most beginner positions:
- Finger 1 covers fret 1
- Finger 2 covers fret 2
- Finger 3 covers fret 3
- Finger 4 covers fret 4
This method helps maintain consistent spacing and reduces hand strain.
Guitarists can tune confidently when the pitch detector tool confirms each string’s frequency.
What a Bass Guitar Fingering Chart Shows
A complete fingering chart includes:
Fretboard Note Names
All natural notes, sharps, and flats across each string.
Suggested Finger Numbers
Guides which finger to use on each fret.
Position Markers
Dots on the 3rd, 5th, 7th, 9th, and 12th frets help with navigation.
Scale Fingerings
Common patterns for major, minor, and pentatonic scales.
First Position Guide
Shows beginner-friendly finger assignments.
Example of First-Position Fingering
In “first position,” your hand stays over frets 1–4:
- Fret 1 → Index finger
- Fret 2 → Middle finger
- Fret 3 → Ring finger
- Fret 4 → Pinky
This foundational position simplifies learning scales and bass lines while improving accuracy.
Types of Bass Guitar Fingering Charts
1. Beginner Fingering Chart
Shows open strings, first-position notes, and basic finger use.
2. Full Fretboard Chart
Maps all notes up to the 12th or 24th fret.
3. Scale Fingering Charts
Major, minor, pentatonic, and blues scale fingerings.
4. Arpeggio Charts
Finger positions for playing chords and broken patterns.
5. Position Shift Charts
Show how to move your hand smoothly across the neck.
How a Fingering Chart Helps You Learn Faster
Helps Memorize Notes
Seeing the fretboard visually helps beginners retain note locations.
Builds Coordination
Both left-hand and right-hand coordination improve with structured finger use.
Makes Learning Songs Easier
You’ll know exactly where to place fingers for common riffs and patterns.
Strengthens Musical Understanding
Finger charts connect fingering with note theory.
Tips for Using a Bass Guitar Fingering Chart
- Practice slowly and keep movements controlled
- Keep fingers curved and stay close to the frets
- Learn one string at a time
- Review the chart daily
- Use a metronome for timing
- Avoid pressing too hard — use just enough pressure
Common Beginner Mistakes (and How to Fix Them)
Using the Same Finger for Every Note
Solution: Follow the 1–2–3–4 finger rule for each fret.
Collapsing Finger Joints
Solution: Keep fingers curved and use fingertip pressure.
Lifting Fingers Too High
Solution: Keep fingers close to the strings for faster movement.
Feeling Lost on the Fretboard
Solution: Study the chart and practice scales to learn note positions.
Final Thoughts
A bass guitar fingering chart is one of the most powerful tools for beginners. It teaches proper finger technique, helps you understand the fretboard, and speeds up your ability to play scales, patterns, and songs. With regular practice and the right fingering habits, you’ll build the foundation needed to play confidently and cleanly across the entire bass neck.